|
 |
|
|
|
|
| Occurs when unable to read ROM data properly while power is on. |
 |
- After turning power off, run preparations for operation.
The controller is damaged if error message re-appears. This will require replacement of controller.
Please contact a Matsui service office near your area.
|
|
|
|
|
|
|
|
|
|
|
|
| Occurs when connection of power cord is in reverse phase. |
|
 |
Before starting work, turn power breaker off.
Always connect earths.
After work, securely tighten connections. |
|
- Of the three lines of the power cords (red, white, black), change hook-up of two lines and turn power breakers on.
|
|
|
|
|
|
|
|
|
|
|
Will occur when the thermal relay to the electromagnetic switch on the drying blower or the circuit protectors (CP-2) of the regeneration blower and honerycomb rotation motor protect trip.
 |
- Grease inside blower is deteriorating.
- Line Filter is clogged.
- Motor Relay is in single phase.
- Thermal setting values not set correctly.
|
|
|
|
- Was there any abnormal noise coming from the blower before the alarm?
Noise may come from the blower when the grease condition in the bearing deteriorates.
If there was noise, replace bearing or blower.
Press the CLICK buttons and contact your local Matsui service persons.
- Is the line filter clogged?
If clogged, extra load will be applied to the blowers and trip the thermals.
Please inspect and clean the filters.
| [Point] |
- Wear a mask when cleaning. Dust/particles will disperse in the air when blowing dry air.
- After cleaning, set filter in the original position and fasten securely.
- When the filter is badly clogged, replace with new filters.
|
- Check to see if motor relay (EM Switch) connection is worn or not.
Using the Motor Heater Damage Inspection as reference, check to see if relay is in single phase or not.
If so, replace motor relay.
- Check the thermal setting value in the control panel.
Using the DMD4 Thermal Value as reference, check to see if the correct values are being used.
|
|
|
|
|
|
|
|
| E3 Convey Blower Overload |
|
|
|
Will occur when the thermal relay to the electromagnetic switch on the convey blower trips.
Will recover when re-starting the unit after pressing the reset button on the electromagnetic switch in the control panel.
|
- Grease inside blower is deteriorating.
- Line Filter is clogged.
- Motor Relay is in single phase.
- Thermal setting values not set correctly.
|
|
|
|
- Was there any abnormal noise coming from the blower before the alarm?
Noise may come from the blower when the grease condition in the bearing deteriorates.
If there was noise, replace bearing or blower.
Press the CLICK buttons and contact your local Matsui service persons.
- Is the line filter clogged?
If clogged, extra load will be applied to the blowers and trip the thermals.
Please inspect and clean the filters.
| [Point] |
- Wear a mask when cleaning. Dust/particles will disperse in the air when blowing dry air.
- After cleaning, set filter in the original position and fasten securely.
- When the filter is badly clogged, replace with new filters.
|
- Check to see if motor relay (EM Switch) is in single phase.
Using the Motor Heater Damage Inspection as reference, check to see if relay is in single phase or not.
If so, replace motor relay.
- Check the thermal setting value in the control panel.
Using the DMD4 Thermal Value as reference, check to see if the correct values are being used.
|
|
|
|
|
|
|
|
|
|
|
Will occur when the drying/regenerate detection temperature (PV) exceeds the difference between the setting value (SV) and the upper limit set value (dUS for drying side, rUS for regenerate side).
A Wait sequence is included in the functions. When reducing the setting value (SV), temperature will drop down to settings level before functioning.
After returning back to normal temperatures, press "reset" button to recover.
|
- Drying/Regenerate Set Temperature (SV) settings within standard range but dUS and rUS settings are inadequate.
- Drying/Regenerate blower not circulating air properly.
- Drying/Regenerate Line Filter is clogged.
|
|
|
|
-
Check to see if Drying/Regenerate set temperatures are within range. Also, check to see if dUS and rUS settings are adequate or not.
Check upper temperature settings.
If pressing SV switch for more than five seconds, unit will enter Engineering Setting Mode. Display will change every time SV switch is pressed during this mode.
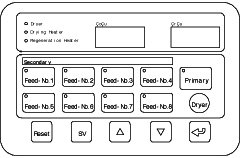 |
- Hold SV switch down for more than 5 seconds.
- Hold SV switch until dUS or rUS appears.
- Change the setting value.
| [Point] |
| |
Setting Range |
0~40 degrees C |
| Original Setting |
10 degrees C |
See Engineering Setting Mode Parameters
|
- Check to see if Drying/Regenerate blowers are circulating.
If air is not circulating, an error will occur due to the sensor area temperature not increasing.
- Remove hose and check the circulating air after letting the temperature cool down.
Do not work under high temperatures.
- If air is not circulating, inspect or clean the line filter.
|
- Is the line filter clogged?
If the line filter is clogged, heat will be absorbed, cause abnormal heating and sound an alarm. Inspect and clean filter.
| [Point] |
- Wear a mask when cleaning. Dust/particles will disperse in the air when blowing dry air.
- After cleaning, set filter in the original position and fasten securely.
- When the filter is badly clogged, replace with new filters.
|
|
|
|
|
|
|
|
|
|
|
|
Alarm will occur when drying temperature measurements are out of range or when thermocouple for temperature measuring is disconnected. Also, if drying disconnect detect timer dLP is set, the alarm will also go off after re-starting when the drying heater output continues and the set time is maintained.
Will automatically recover after recovering.
|
- Set time for dLP (drying disconnect detect time) is too short.
- Blower not circulating air normally.
- Disconnected K1 (heat resistance), EH1 (heater), MC-0, SSR-1 (heater drive contactor) and connection wires as well as abnormal function.
|
|
|
|
Before inspecting, stop operation of unit. After checking that unit has stopped completely, turn power breaker off and wait until heating section has cooled off enough to avoid burns. |
|
- Is the dLP time too short?
If pressing SV switch for more than five seconds, unit will enter Engineering Setting Mode. Display will change every time SV switch is pressed during this mode.
|
- Hold SV switch down for more than 5 seconds.
- Hold SV switch until dUS or rUS appears.
- Change the setting value.
| [Point] |
| |
Setting Range |
0~40 degrees C |
| Original Setting |
10 degrees C |
See Engineering Setting Mode Parameters
|
- Check to see if Drying blower is circulating.
If air is not circulating, an error will occur due to the sensor area temperature not increasing.
- Remove hose and check the circulating air after letting the temperature cool down.
Do not work under high temperatures.
- If air is not circulating, inspect or clean the line filter.
|
- Are there any disconnected K1 (heat resistance), EH1 (heater), MC-0, SSR-1 (heater drive contactor) and connection wires? Any abnormal functions?
Heater contacters use SSR but they can be damaged from short-circuits or rise in temperature of enviroment.
|
|
|
|
|
|
|
|
| E6 Regenerate Sensor Malfunction |
|
|
|
Alarm will occur when drying temperature measurements are out of range or when thermocouple for temperature measuring is disconnected. Also, if drying disconnect detect timer rLP is set, the alarm will also go off after re-starting when the regenerate heater output continues and the set time is maintained. Will automatically recover after recovering.
|
- Set time for rLP (drying disconnect detect time) is too short.
- Blower not circulating air normally.
- Disconnected K2 (heat resistance), EH2 (heater), MC-0, SSR-2 (heater drive contactor) and connection wires as well as abnormal function.
|
|
|
|
- Is the set time for rLP (drying disconnect detect time) is too short?
If pressing SV switch for more than five seconds, unit will enter Engineering Setting Mode.
Display will change every time SV switch is pressed during this mode.
|
- Hold SV switch down for more than 5 seconds.
- Hold SV switch until dUS appears.
- Change the setting value.
| [Point] |
| |
Setting Range |
0~40 degrees C |
| Original Setting |
10 degrees C |
See Engineering Setting Mode Parameters
|
- Check to see if Drying blower is circulating.
If air is not circulating, an error will occur due to the sensor area temperature not increasing.
- Remove hose and check the circulating air after letting the temperature cool down.
Do not work under high temperatures.
- If air is not circulating, inspect or clean the line filter.
|
- Are there any disconnected K2 (heat resistance), EH2 (heater), MC-0, SSR-2 (heater drive contactor) and connection wires? Any abnormal functions?
Heater contacters use SSR but they can be damaged from short-circuits or rise in temperature of environment.
|
|
|
|
|
|
|
|
| E7 Primary (1st) Convey Abnormal |
|
|
|
Error will happen when unit is empty even whe primary convey function is done until the LCt number (Primary Convey Abnormal Detect), when Hopper Material Level Meter will not empty even after the secondary conveying (either Feed- No.1~No.8) is done until the FCt count (Drying Level Meter Abnormal Detect) or when the material empty condition in the drying hopper exceeds the PE d time during conveying to the dryer.
Will automatically re-start after recovering from abnormal.
|
- No material in the primary conveying.
- Level Meter not detecting full load normally.
- .Line Filter is clogged.
- Changeover Valve at conveying direction not functioning normally.
- An obstruction inside hose is caused by materials.
- Exhaust cylinders not functioning normally.
- Hose is torn.
|
| |
|
- Is material in the primary conveying section (material tank, paper tie, etc).
Check by viewing.
- Is the level meter detecting full load normally?
If the drying hopper does not stop conveying even with plastic in it, meter may be becoming defective.
Procedures
- Remove cover of level meter, manually move contact point and see if conveying stops.
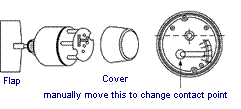
- If conveying does not stop, replace level meter.
|
- Is the line filter clogged?
If the filter is clogged, suction strength will decline, leading to conveying defects.
Procedures
| [Point] |
- For cleaning by blowing dry air, particles will fly in the air. Please wear a mask to do the work.
- After cleaning, please return filter back to its original position securely.
- If badly clogged, replace filter.
|
- Is the Changeover Valve at conveying direction not functioning normally.
If not, the conveying direction will not change over and may prevent transfer toward No. 1 direction.
Procedures
- Check to see if conveying is done towards primary side or other directions when conveying starts.
- If conveying, a defective solenoid valve or improper output from the control panel may have caused the problem.
Solenoid Valve Check
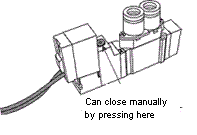 |
- If conducting electricity, press the manual button on the solenoid valve and see if cylinder runs.
- If running, valve is either defective or power is not running through. Check to see how power is transferred to valve or the valve itself.
|
|
- An obstruction inside hose is caused by materials.
If 2nd air is not properly brought in during conveying, ratio of material in hose will increase and cause an obstruction inside hose.
Procedures
- Remove material causing obstruction
- Try conveying again and check status of materials in hose.
- If there is too much material in the hose, adjust secondary air. Also, if filter is clogged, do clean-up work.
|
[Point] The suitable ratio between material and air in the hose is 2:8.
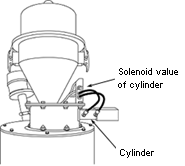
- Exhaust cylinders not functioning normally.
If cylinder does not function because of air pressure or the solenoid valve, an error will occur since the conveyed material will not release.
 |
|
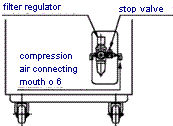
- Check the readings on the regulator. The normal pressure should be 0.4 Mpa ~0.6 Mpa. If the pressure is either too high or too low, cylinder will not run.
- If there are any abnormalities in air pressure, either adjust the regulator or inspect your company's air equipment.
|
|
- If electricity is running, press the solenoid valve manual button and see if cylinder runs.
- If cylinder runs, either electricity is not running through or the solenoid valve is defective. Check condition of electricity running through or the solenoid valve.
|
- Check to see if hose is torn.
If torn, suction strength will decline and cause convey problems.
Procedures
- Check to see if hose is torn. If any tear or damage is found, replace hose.
|
|
|
|
|
|
|
|
|
| E8 Feed-No. 1 Convey Abnormal (same measures will apply to E9 ~ E15) |
|
|
|
Will occur when empty condition in forming hopper exceeds the convey abnormal detect delay time "1Ed" during conveyance to the No. 1 forming unit.
|
- No material in the drying hopper.
- Sensor (material detector) not detecting full load normally.
- Line Filter is clogged.
- Changeover Valve at conveying direction not functioning normally.
- An obstruction inside hose is caused by materials.
- Exhaust cylinders not functioning normally.
- Hose is torn.
|
|
|
|
- Is material in the primary conveying section (material tank, paper tie, etc)?
Check by viewing.
- Is the sensor detecting full load normally?
If the forming hopper does not stop conveying even with plastic in it, sensor may be becoming defective.
Procedures
- Is the line filter clogged?
If the filter is clogged, suction strength will decline, leading to conveying defects.
Procedures
| [Point] |
- For cleaning by blowing dry air, particles will fly in the air. Please wear a mask to do the work.
- After cleaning, please return filter back to its original position securely.
- If badly clogged, replace filter.
|
- Is the Changeover Valve at conveying direction not functioning normally?
If not, the conveying direction will not change over and may prevent transfer toward No. 1 direction.
For the DMD4-25, the valve is located inside the machine, but for the DMD4-50 ~ DMD4-200, the valve is attached to the pipes of each forming hopper.
Procedures
- Check to see if conveying is done towards primary side or other directions when conveying starts.
- If conveying, a defective solenoid valve or improper output from the control panel may have caused the problem.
Solenoid Valve Check
|
- If conducting electricity, press the manual button on the solenoid valve and see if cylinder runs.
- If running, valve is either defective or power is not running through. Check to see how power is transferred to valve or the valve itself.
|
|
- An obstruction inside hose is caused by materials.
If conveying time or start out time setting is not sufficient, material will not be fully transferred and cause an obstruction inside hose.
Procedures
- Remove material causing obstruction.
- Try conveying again and check to see if material has been fully transferred.
- If material is not fully transferred, adjust setting values.
Parameter display will change after pressing SV switch every time. But if switch is held for more than 5 seconds, panel will switch to engineering setting mode, therefore requiring extra caution when using switch.
 |
- Press the SV switch.
- Press SV switch until Fd1 (No. 1 convey time) and bt1 (No. 1 Material Start Out Time) appears.
- Change setting value.
|
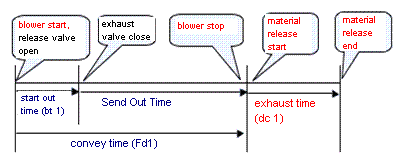
| [Point] Convey Time Chart |
 |
|
- Exhaust cylinders not functioning normally.
If cylinder does not function because of air pressure or the solenoid valve, an error will occur since the conveyed material will not release.
|
|
- Check the readings on the regulator. The normal pressure should be 0.4 Mpa ~0.6 Mpa. If the pressure is either too high or too low, cylinder will not run.
- If there are any abnormalities in air pressure, either adjust the regulator or inspect your company's air equipment.
|
|
- If electricity is running, press the solenoid valve manual button and see if cylinder runs.
- If cylinder runs, either electricity is not running through or the solenoid valve is defective. Check condition of electricity runnign through or the solenoid valve.
[Point]
Valve is at the outer board of rear side.
|
- Check to see if hose is torn.
If torn, suction strength will decline and cause convey problems.
Procedures
- Check to see if hose is torn. If any tear or damage is found, replace hose.
|
|
|
|
|
|
|
|
|
|
|
|
Occurs when heater thermostat detects overheating.
|
- SSR is not functioning normally.
- Overheat protector settings are not adequate.
- Line Filter is clogged.
|
| |
|
- Check to see if SSR is abnormal.
Heater contacters use SSR but they can be damaged from short-circuits or rise in temperature of enviroment.
See SSR (solid state relay) Inspection for reference to check SSR.
- Check the settings of the overheat protector.
If settings are improper, this may lead to functioning errors.
Overheat protector
 |
Set value of overheat protector in control panel to 15 ~ 20 degrees C over the set temperature (SV). |
- Check to see if Line Filters are clogged.
If clogged, heat will be absorbed, abnormal overheating will occur and allow safety set-ups to activate.
Inspect and clean filters.
| [Point] |
- When blowing dry air, always wear a mask. Particles will scatter in air during cleaning.
- After cleaning, set the filter back in position securely.
- If badly clogged, replace with new filter.
|
|
|
|
|
|
|
|
|
| E18 Lower Limit Temperature Abnormal |
|
|
|
Will occur if the drying/regenerate detect temperature "PV" is under the difference between the SV (set value) and the lower limit temperature (dLS for drying, rLS for regenerate side).
A wait sequence is included in the functions. Even when the SV is increased, sequence will function after arriving at the set temperature. Unit will automatically function after returning to normal temperature.
|
- Drying/Regenerate lower limit temperature (dLS for drying, rLS for regenerate side) is not sufficient.
- Disconnected heater (EH1, 2), heater drive contactor (MC-0, SSR-1, 2) and connection wires as well as abnormal function.
- Drying/Regenerate Blower not circulating air normally.
|
|
|
|
- Is the set time for the lower limit temeprature adequate (dLS and rLS)?
If pressing SV switch for more than five seconds, unit will enter Engineering Setting Mode. Display will change every time SV switch is pressed during this mode.
|
- Hold SV switch down for more than 5 seconds.
- Hold SV switch until dUS (upper limit temperature alarm)appears.
- Change the setting value.
| [Point] |
| |
Setting Range |
0~40 degrees C |
| Original Setting |
10 degrees C |
See Engineering Setting Mode Parameters
|
- Are there any disconnected heaters (EH1, 2), heater drive contactor (MC-0, SSR-1, 2) and connection wires? Any abnormal functions?
Heater contacters use SSR but they can be damaged from short-circuits or rise in temperature of enviroment.
- Check to see if Drying blower is circulating.
If air is not circulating, an error will occur due to the sensor area temperature not increasing.
- Remove hose and check the circulating air after letting the temperature cool down.
Do not work under high temperatures.
- If air is not circulating, inspect or clean the line filter.
|
|
|
|
|
|
|
|